Teamviewer14 on a raspberry pi running ubuntu 18.04 64bit

You can install Teamviewer in text only mode – yes it will show the console on the remote connection!
You need to assign it to your Teamviewer account in this case as there is no way for it to show you a password…
It works fine in graphical mode too of course.

If you try to download and install Teamviewer on a 64bit aarm64 distribution, it will show you lot’s of dependencies that can’t be satisfied because of the missing armhf architecture.
But don’t fear, we can install them easily by just adding the architecture, similar to x64 and x86 based systems.

sudo apt update
sudo apt upgrade
sudo dpkg --add-architecture armhf
wget https://download.teamviewer.com/download/linux/teamviewer-host_armhf.deb
sudo apt install ./teamviewer-host_armhf.deb
sudo teamviewer setup

And that’s it already.
You get Teamviewer running on Ubuntu 18.04 aarm64 without the need for a graphical user interface at all.

Also try:

teamviewer info
teamviewer help

Use spamassassin from fetchmail – no mta config, no procmail

Once you get it, you get it.

mda "/usr/bin/spamc -f -e /usr/sbin/sendmail -oi -f %F %T"

It’s really easy with the MDA option from fetchmail. I’m on ubuntu-18.04 but it works with similar versions and debian too. Make sure your version of fetchmail supports the MDA config option!

I will not cover how to install and configure spamassassin here, we assume it’s installed and has a basic working setup. Same for fetchmail of course. You can run fetchmail as a system service, call it from cron, have global or per user config, the only “magic” is to add the mda option like this to call spamassassin and have it deliver the mail locally afterwards:

poll mail.server.tld with proto whatever user remoteuser there with password "s3cr3t4ndS3cur3" is localuser here use ssl and fetchall mda "/usr/bin/spamc -f -e /usr/sbin/sendmail -oi -f %F %T"

As you can see, keep whatever your poll line looks like, just add the MDA option in the end like the example shows. It assumes your MTA comes with a sendmail compatible wrapper (most do, certainly postfix does).

Setting up 3 nodes HA cluster using CEPH storage for KVM (and LXC) – Part 2

After having finished the basic installation of the cluster an ceph it’s time to setup the cluster storage.
First off I will recap what has been done so far and what the disks look lile, then explaining how I plan to use them:

We have installed the ceph software and setup monitors on all of our nodes:

pveceph install -version hammer
pveceph init --network 10.10.67.0/24 # only once
pveceph createmon

The actual disk layout is:

node01, node02:
– 1x 370GB HW-RAID0 SSD (osd.0, osd.3)
– 2x 1TB SATA (osd.1, osd.2, osd.4, osd.5)

node03:
– 2x 2TB HW-RAID0 SATA (osd.6, osd.7)
– 1x 1TB HW-RAID1 (SW-RAID
– 1x 870GB HW-RAID1

Within Ceph we want 3 copies of the data, one on each node. We will be using the SSDs as a writeback cache pool. Ideally the cache pool beeing “local” to the VM should be used (only), because the main bottelneck is network bandwith (only 1GBit). Additionally the SSDs wil hold our (external) journals.

First create 2 OSDs on the SATA drives with external journals on the SSD, this can easily be accomplished from the web GUI.
Then we need to create the OSD on the remaining space of the SSD, which is not that as easy and needs to be done from the commandline:

DEVICE=/dev/sdb # the SSD HW-RAID0
PARTITION=3 # the next unused partition
OSD_UUID=$(uuidgen -r) # a unique UUID for the OSD
PTYPE_UUID=4fbd7e29-9d25-41b8-afd0-062c0ceff05d # the default PTYPE UUID ceph uses (from the source)
FSID=345abc67-de89-f012-345a-bc67de89f012 # taken from /etc/ceph/ceph.conf

sgdisk --largest-new=$PARTITION --change-name="$PARTITION:ceph data" --partition-guid=$PARTITION:$OSD_UUID --typecode=$PARTITION:$PTYPE_UUID -- $DEVICE
partprobe # to read new partition table
gdisk -l $DEVICE # verify the rest of the space on the device got allocated to a ceph data partition

ceph-disk prepare --cluster ceph --cluster-uuid $FSID $DEVICE$PARTITION
ceph-disk activate $DEVICE$PARTITION

After creating a pool named rbd, the keyring needs to be copied:

cd /etc/pve/priv/
mkdir ceph
cp /etc/ceph/ceph.client.admin.keyring ceph/rbd.keyring

Setting up 3 nodes HA cluster using CEPH storage for KVM (and LXC) – Part 1

I’ve got 3 physical nodes, two HP ProLiant 320e Gen8v2 and a HP MicroServer Gen8 with two Gbit NICs and an ILO interface.
One of the NICs is connected to the external network. The other one and the ILO are connected to an internal switch using a NAT gateway to connect to the external net (this is neccessary for installing updates, syncing time and accessing the management interface at all from outside).


Network configuration (/etc/network/interfaces) looks like this on all nodes:

auto lo
iface lo inet loopback

# the internal interface, used for storage traffic,
# cluster traffic and internal inter VM communication too.
# this should really be split into VLANs and using
# a bond connected to two different physical switches *at least*
# having an extra (10G) interface for storage would be a plus
auto eth0
iface eth0 inet manual

# bridge to allow VMs to be connected to the physical interface
auto vmbr0
iface vmbr0 inet static
        address 10.10.67.10
        netmask 255.255.255.0
        gateway 10.10.67.1
        bridge_ports eth0
        bridge_stp on
        bridge_fd 0

# the external interface connected to the outer world
# this has no IP here, as the host is not accessible from
# the outside directly, but needs access itself, see gateway above
auto eth1
iface eth1 inet manual

# bridge to allow VMs to be connected to the physical interface
auto vmbr1
iface vmbr1 inet manual
        bridge_ports eth1
        bridge_stp on
        bridge_fd 0

Each of the ProLiant servers has two 250GB SSDs and two 1TB SATA drives, configured as follows:

Array 1: 2x250GB SSD
– Volume 1: 2x65GB RAID1 (root filesystem and swap)
– Volume 2: 2x185GB RAID0 (Ceph cache OSD)
Array 2: 1x1TB SATA
– Volume 3:  1x1TB RAID0 (Ceph storage OSD)
Array 3: 1x1TB SATA
– Volume4: 1x1TB RAID0 (Ceph storage OSD)

The MicroServer has four 2TB SATA drives, configured in a similar fassion:

Array 1: 2x2TB SATA
– Volume 1: 2x130GB RAID1 (root filesystem and swap)
– Volume 2: 2x1TB RAID0 (Ceph storage OSD)
– Volume 3: 2x 870GB RAID1 (Backup stroage, softRAID0, NFS export)
Array 2: 2x2TB SATA
– Volume 4: 2x1TB RAID0 (Ceph storage OSD)
– Volume 5: 2x 1TB RAID1 (Backup storage, softRAID0, NFS export)


Now install the three nodes , I choose 32GB root, 32GB swap, entered the corresponding, local, IP address and gateway as shown (will overwrite the configuration anyways with the file above), local hostname, password and admin email address and be done!

Login to the new installed nodes to setup the network, install some additional software, if needed, and ceph:

root@nodeXX:~#
aptitude update
aptitude dist-upgrade
aptitude install mc openntpd ipmitool
pveceph install -version hammer
mcedit /etc/network/interfaces
# copy&paste action here
reboot

After this has been done on all nodes, we install the cluster and initial ceph configuration.
On the first node do:

root@node01:~#
pvecm create cluster1
pveceph init --network 10.10.67.0/24
pveceph createmon

On all the other nodes:

root@nodeXX:~#
pvecm add 10.10.67.10 # this is the IP of the first node
pveceph createmon

Check the status of the cluster and ceph, additionally check that /etc/hosts contains all nodes names – on every node, if not add them now:

pvecm status # show all nodes
ceph status # show all monitors
cat /ets/hosts # should show all the nodes names, FQDN too
10.10.67.10 node01.local node01 pvelocalhost
10.10.67.20 node02.local node02
10.10.67.30 node03.local node03
Enable TRIM (SSD) on encrypted (and/or) LVM volume

For it to work you need several adjustments, every layer needs to support TRIM, have the support enabled and pass the information down to the next, till it reaches the physical layer.

Lets start at the highest layer in the stack, the filesystem:
Edit /etc/fstab to include the discard mount option where needed (keep in mind that the FS needs to support it, ext4 does):

/dev/mapper/lvm_crypt /data           ext4    defaults,discard        0       2

Next comes the logical volume manager – which is optional and should by default be setup correctly already. Anyway check to be sure that you got the following line in /etc/lvm/lvm.conf:

issue_discards = 1

Last but not least we need to tell the encryption layer to issue the trim commands too. For this to work you need to edit /etc/crypttab to include the discard option:

lvm_crypt UUID=a-uuid-or-device-path none luks,discard

After having changed the crypttab (and lvm.conf) it is neccessary to update the initrd image for the changes to take effect (at next boot):

sudo update-initramfs -k all -c

Reboot and test if it’s working:

sudo fstrim /data


Talking about development practice on IRC

…I do understand that it is tempting, but it is just wrong for the (almost obvious) reasons i already pointed out. There is an easy rule to follow.

You should not start with the wrong approach in the first place. This is why i discourage it completely.

Tell/teach only best practices. Talk about the drawbacks and lessons learned already. Point out what’s wrong with the other approaches as they get mentioned. Stop bad practice at first – if you are in the position.

– Be a good senior!

Often times people do not want to hear what you have to say. Many times they don’t listen and don’t care. Some times they come back and wish they would have.

That’s not your burden though…

Simplest GIT Server (over ssh)

If you should ever come to the need to have your own, personal git server and got shell access almost anywhere – here is how to set it up and use it.

Prerequisites

  • Shell access to a host on the net (this means you do have an user account with ssh login, ftp or the like will not suffice)
  • Optional extra: You are able to create a user to use with git (beforehand) – no need to do so, can be used with your normal user account though
  • Git installed on your machine and the remote, of course

Create a new remote repo

Log in to your (remote) host via ssh:

me@localhost:~$ ssh user@host

The following commands will create a directory called repos in your home dir and create a new git repo called name_of_repo.git there:

user@host:~$ mkdir repos
user@host:~$ cd repos
user@host:~/repos$ GIT_DIR=name_of_repo.git git init

That’s it!

Use it

Back on our local machine we want to clone that repo:

me@localhost:~/work/$ git clone user@host:~/repos/name_of_repo.git

If you already have data you want to put into your new remote repo you can do so as well, just add the new remote to your local git repo like that:

me@localhost:~/work/my_existing_local_git_repo/$ git remote add origin user@host:~/repos/name_of_repo.git

Last step is to push your local changes to the remote repo, as usual:

me@localhost:~/work/name_of_repo/$ git push origin master

And that is all there is to it!

Some extra stuff

Of course you can put your ssh public-key on the remote server, if you have not already done so, not to have to enter your password everytime you use git.

If you have created an extra git-repo user on your remote host, you can even give access to the repos to others by putting their ssh public-keys in the ~/.ssh/authorized_keys2 file.
WARNING: Be aware that they will have full shell access too, if you do not limit the according keys to only beeing able to use git! – Feel free to ask for details…

XRDP connection error, gnome Vino security settings

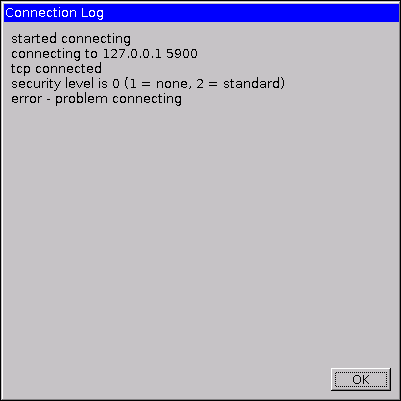
After having installed the new Trusty 14.04 LTS release – finally, I came across a problem that showed to be caused by the “new” default security setting of Gnome Vino. I was no longer able to connect to the console through XRDP:

XRPD: Connection Log
Connection Log … error – problem connecting

Fix is simple:

user@localhost:~$ gsettings set org.gnome.Vino require-encryption false

Of course you need to enable desktop sharing, allow other users to view your desktop and require the user to enter a password when connecting in the preferences, like before.

After that, login again and you are able to connect to the console via XRDP again.